[Auth] Authentik
#Authentik #Authentik_not_found #Authentik_permission_denied # Authentik_Redirect_URI
✏️ Authentik이란?
authentik은 오픈소스 IDP 시스템이다.
◼︎ 특징
-
- SSO 지원
- 한 번 로그인하면 여러 서비스에서 자동으로 로그인됨
-
- MFA 지원
- OTP, 지문 인식, 보안 키 등 추가 인증 방식 제공
-
- 리버스 프록시 기능
- 기존 웹사이트에 추가 보안 기능을 적용할 수 있음
◼︎ Core Concept - Flows & Stages
Flows & Stages는 Authentik의 주요 기능 중 하나로, 인증 흐름을 설계할 수 있게 해준다.
Flows
: 사용자의 인증, 등록, 복구 등 특정 작업을 수행할 때 거치는 일련의 단계를 정의한 설계도 각 Flow는 여러 개의 Stage로 구성된다.
주요 Flows 예시
- Authentication: 사용자 인증을 위한 Flow
- Enrollment: 신규 사용자 등록을 위한 Flow
- Recovery: 계정 복구를 위한 Flow
Stages
: Flow 내에서 하나의 검증 또는 논리 단계 각 Stage는 사용자 입력, 검증, 리디렉션 등의 역할을 수행한다.
주요 Stages 예시
- Identification Stage: 사용자 식별 (예: 사용자명 또는 이메일 입력)
- Password Stage: 비밀번호 입력 및 검증
- Authenticator Validation Stage: 2단계 인증 기기 검증
관리자는 원하는 순서로 Stage를 조합해 Flow를 설계할 수 있으며, 각 단계마다 policy를 걸어 사용자 유형에 따라 흐름을 다르게 구성하는 것도 가능하다. 예를 들어, 사용자가 로그인할 때 단순히 ID와 비밀번호만 입력하도록 구성할 수도 있고, 특정 사용자 그룹에 한해 2단계 인증을 추가할 수도 있다.
✏️ Authentik의 OAuth 2.0
Authentik은 두 가지 역할을 할 수 있다.
-
OAuth 2.0 제공자(OP, OpenID Provider) → IDP 역할
- Authentik이 인증을 담당하는 “로그인 제공자” 역할을 한다.
- 예를 들어, 사용자가 웹 애플리케이션에 로그인할 때, Authentik이 사용자 인증을 수행하고, 애플리케이션에 정보를 제공한다.
-
OAuth 2.0 소비자(RP, Relying Party) → 외부 IDP 사용
- Authentik이 외부 서비스(Google, GitHub 등)와 연동하여 로그인할 수 있도록 한다.
- 즉, 사용자가 Authentik을 거쳐 외부 OAuth 제공자를 이용해 로그인할 수 있다.
◼︎ 인증 과정
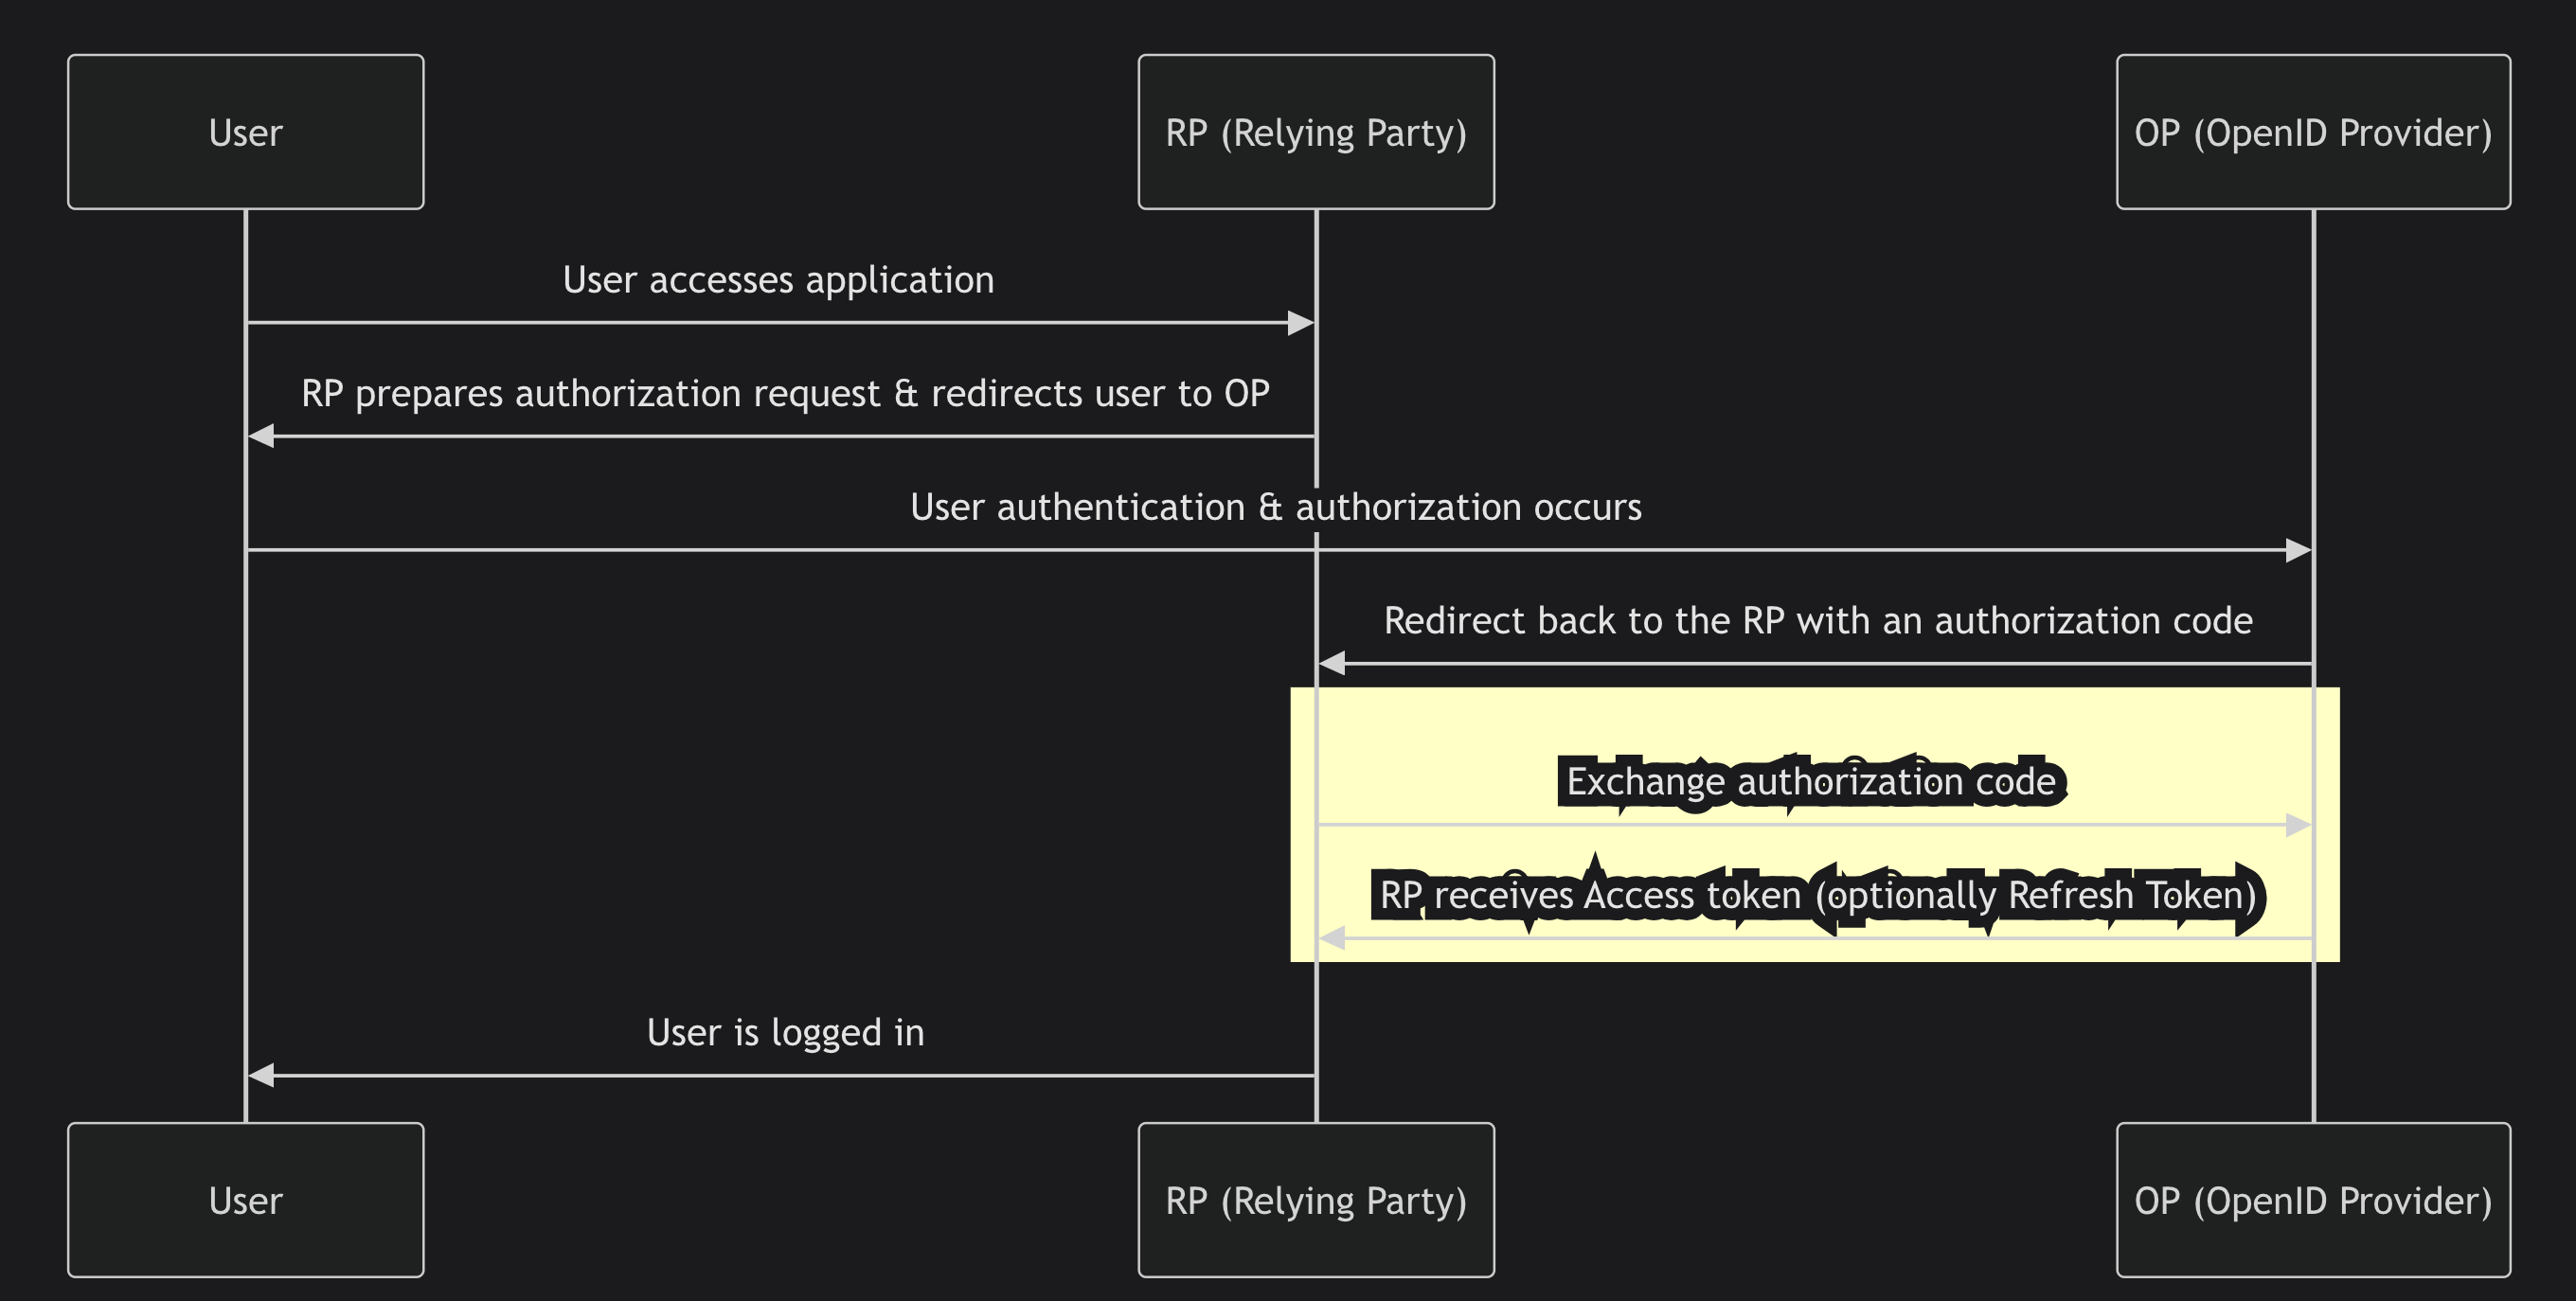
OAuth 2.0의 기본적인 인증 흐름은 다음과 같다.
- 사용자가 애플리케이션(RP) 에 접속한다.
- RP는 Authentik(OP) 로 사용자를 보낸다.
- 사용자가 Authentik에서 로그인하면, 인증 코드가 RP로 반환된다.
- RP는 이 인증 코드를 사용하여 Access Token을 요청한다.
- OP(Authentik)는 Access Token(및 Refresh Token) 을 RP에 전달한다.
- RP는 Access Token을 사용하여 사용자 정보를 요청할 수 있다.
✏️ Authentik 적용 방법(로컬)
Authentik을 어플리케이션에 적용하는 방법은 이 포스팅에 잘 설명되어 있다. <출처: IT-SVR 달소 - 오픈소스 Authntik 로 SSO 서버 자체 구축하기.>
필자가 위의 과정을 따라하면서 발생했던 오류 몇가지들을 아래에 적어두었다.
1. Authentik Permission Denied
docker-compose up으로 Authentik을 실행시키면 다음과 같은 에러 로그가 뜬다.
1
2
3
worker-1      | chown: changing ownership of '/media/public': Permission denied
worker-1      | chown: changing ownership of '/media': Permission denied
worker-1      | chown: changing ownership of '/certs': Permission denied
이 에러 로그가 뜨면, authentik에 처음 접속했을 때 Not Found가 리턴되면서 다음 과정으로 넘어갈 수 없다.
해결방법 :
docker-compose.yml파일에서user: root를 제거한다.
2. Redirect URI Error
authentik에 접속해서 Provider를 만들 때, Redirect URI를 요구하는 필드가 있다. Redirect URI 필드는 자신이 사용하는 라이브러리에 맞게 조정해줘야 한다.
ex) NextAuth는 /api/auth/callback/{providerId} 패턴을 사용한다. NextAuth에서는 OAuth 2.0 및 OpenID Connect (OIDC) 인증을 처리할 때, 자동으로 callback 엔드포인트를 생성한다. 기본적으로 모든 OAuth Provider는 callback 경로를 /api/auth/callback/{providerId} 형태로 생성한다.
- 로컬에서 authentik을 돌리는 경우, provider를 생성할 때 다음과 같이 넣어주면 된다.
http://localhost:3000/api/auth/callback/authentik
1
2
3
4
5
6
7
8
9
10
11
12
13
14
15
16
17
18
import NextAuth from "next-auth";
import AuthentikProvider from "next-auth/providers/auth0"; // OIDC 사용 가능

export const authOptions = {
    providers: [
        AuthentikProvider({
            id: "authentik",  // 이 값이 중요한 부분!
            name: "Authentik",
            clientId: process.env.AUTHENTIK_CLIENT_ID,
            clientSecret: process.env.AUTHENTIK_CLIENT_SECRET,
            issuer: process.env.AUTHENTIK_ISSUER,
        }),
    ],
};


const handler = NextAuth(authOptions);
export { handler as GET, handler as POST };
3. api/auth/signin?error=oauthsignin
정말 고치는데 오랜 시간이 걸렸다.
결론은 AUTHENTIK_ISSUER 환경변수의 문제였다.
 왜 이걸 이제야 봤을까…
AUTHENTIK_ISSUER 환경변수의 끝에 있는 슬래시를 제거했더니 잘 동작했다.
<span style=color:red>⚠️ 백엔드 환경변수에 issuer를 저장할 때는 슬래시를 포함시켜야 한다.</span>
✏️ Authentik refresh token 사용방법
Authentik의 공식 문서
Starting with authentik 2024.2, applications only receive an access token. To receive a refresh token, both applications and authentik must be configured to request the offline_access scope. In authentik this can be done by selecting the offline_access Scope mapping in the provider settings.
Authentik에서는 기본적으로 refresh token을 발급해주지 않는다. refresh token을 발급하기 위해서는 authentik의 provider 설정을 바꿔줘야 한다.
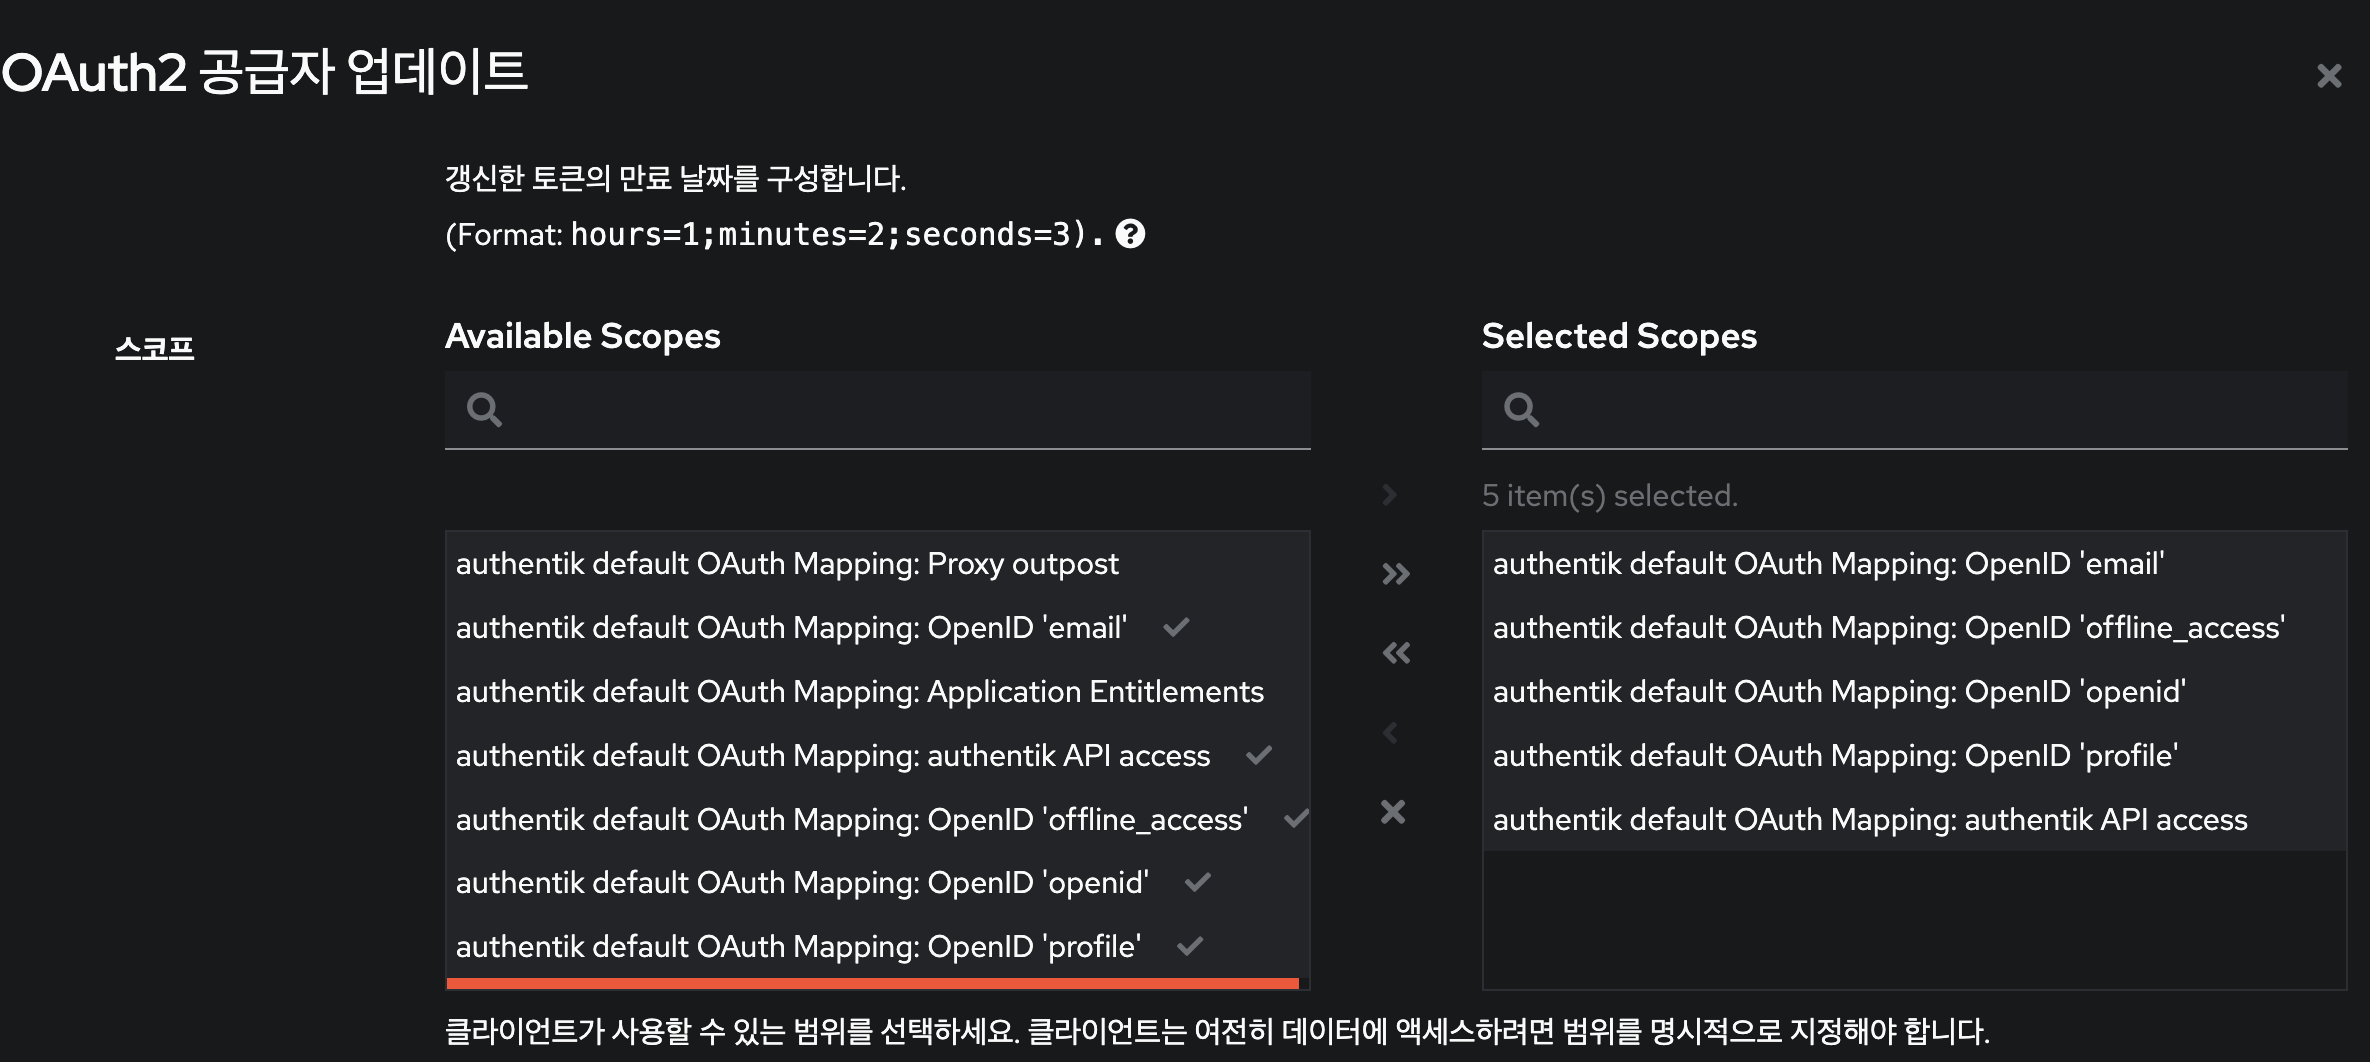
Authentik 관리자로 로그인 한뒤, 아래의 과정을 수행한다. [공급자 - 수정 - 고급 프로토콜 설정 - offline_access 추가]
그런 다음, authorization 관련 코드를 수정한다. 전체 코드:
1
2
3
4
5
6
7
8
9
10
11
12
13
14
15
16
17
18
19
20
21
22
23
24
25
26
27
28
29
30
31
32
33
34
35
36
37
38
39
40
41
42
43
44
45
46
47
48
49
50
51
52
53
54
55
56
57
58
59
60
61
62
63
64
65
66
67
68
69
70
71
72
73
74
75
76
77
78
79
80
81
82
83
84
85
import NextAuth, { NextAuthOptions } from 'next-auth';
import AuthentikProvider from 'next-auth/providers/authentik';

const authOptions: NextAuthOptions = {
  providers: [
    AuthentikProvider({
      id: 'authentik',
      name: 'authentik',
      authorization: {
        params: {
          scope: 'openid email profile offline_access', // ✅ refresh token 받기 위해 필요
        },
      },
      clientId: process.env.AUTHENTIK_CLIENT_ID,
      clientSecret: process.env.AUTHENTIK_CLIENT_SECRET,
      issuer: process.env.AUTHENTIK_ISSUER,
      profile(profile) {
        return {
          id: profile.sub,
          name: profile.name,
          email: profile.email,
        };
      },
    }),
  ],
  session: {
    strategy: 'jwt',
    maxAge: 60 * 60 * 24 * 30, // 30일
  },
  callbacks: {
    async jwt({ token, account, profile }) {
      if (account) {
        return {
          ...token,
          access_token: account.access_token,
          expires_at: account.expires_at as number,
          refresh_token: account.refresh_token, // ✅ refresh token 저장
          uid: profile.sub,
        };
      } else if (Date.now() < (token.expires_at as number) * 1000) {
        return token;
      } else {
        if (!token.refresh_token) throw new TypeError('Missing refresh_token');

        try {
          const response = await fetch(process.env.AUTHENTIK_TOKEN, {
            method: 'POST',
            body: new URLSearchParams({
              client_id: process.env.AUTHENTIK_CLIENT_ID!,
              client_secret: process.env.AUTHENTIK_CLIENT_SECRET!,
              grant_type: 'refresh_token',
              refresh_token: token.refresh_token,
            }),
          });

          const refreshed = await response.json();

          if (!response.ok) throw refreshed;

          return {
            ...token,
            access_token: refreshed.access_token,
            expires_at: Math.floor(Date.now() / 1000 + refreshed.expires_in),
            refresh_token: refreshed.refresh_token ?? token.refresh_token,
          };
        } catch (error) {
          console.error('Error refreshing access_token', error);
          token.error = 'RefreshTokenError';
          return token;
        }
      }
    },
    async session({ session, token }) {
      session.accessToken = token.access_token as string;
      session.refreshToken = token.refresh_token as string;
      session.user.id = token.uid as string;
      session.user.email = token.email as string;
      session.user.name = token.name as string;
      return session;
    },
  },
};

const handler = NextAuth(authOptions);
export { handler as GET, handler as POST };
수정 내용은 아래와 같다.
1. offline_access 스코프 추가
1
2
3
4
5
authorization: {
  params: {
    scope: 'openid email profile offline_access',
  },
}
- offline_access는 OAuth 2.0 표준 스코프로, Authentik에 refresh token 발급을 요청할 수 있도록 명시하는 필수 스코프이다.
- 이 값이 없으면, refresh_token이 아예 반환되지 않는다.
2. 최초 로그인 시 refresh_token 저장
1
refresh_token: account.refresh_token
- 로그인 후 받은 account.refresh_token을 JWT에 명시적으로 저장해야, 이후 access token이 만료되었을 때 이를 사용해 갱신할 수 있다.
3. access token 만료 시 자동 갱신 로직 추가
1
2
3
4
// 토큰이 유효한 경우는 그대로 유지:
else if (Date.now() < (token.expires_at as number) * 1000) {
	return token
}
1
2
3
4
5
6
7
8
9
10
11
12
// 만료된 경우:
if (!token.refresh_token) throw new TypeError("Missing refresh_token");

const response = await fetch(process.env.AUTHENTIK_TOKEN, {
  method: "POST",
  body: new URLSearchParams({
    client_id: process.env.AUTHENTIK_CLIENT_ID!,
    client_secret: process.env.AUTHENTIK_CLIENT_SECRET!,
    grant_type: "refresh_token",
    refresh_token: token.refresh_token as string,
  }),
})
- access token이 만료됐을 때, 저장해둔 refresh_token을 이용해 새로운 access token을 발급받는다.
- grant_type은 반드시 ‘refresh_token’이어야 한다.
✏️ Authentik을 사용하여 UID 추출하는 방법
Authentik은 OIDC및 OAuth2 인증 시스템을 제공할 때, JWT를 활용하여 인증 정보를 관리/전달 한다.
◼︎ JWT란?
JWT
: 인증 및 권한 부여를 위해 사용되는 토큰 기반 인증 방식이다. JWT는 헤더, 페이로드, 서명으로 구성되며, 사용자의 인증 정보를 안전하게 포함할 수 있다. JWT에 대한 포스팅
Authentik에서 JWT를 사용하는 방식은 아래와 같다.
- 사용자가 로그인하면 Authentik이 인증을 처리
- 사용자의 정보(UID, 이메일, 역할 등)를 담은 JWT 토큰을 발급한다.
- 클라이언트가 JWT를 서버에 전달
- API 요청 시 JWT 토큰을 Authorization 헤더에 포함하여 서버로 보낸다.
- 서버(Hono)가 JWT를 검증
- 서버는 Authentik의 공개키를 사용하여 JWT 서명을 검증한다.
JWT를 검증할 때 비대칭 암호화(RS256) 또는 대칭 암호화(HS256)을 사용할 수 있다. 어떤 방식이 사용되느냐에 따라 Public Key 또는 Secret Key가 사용된다.
- 비대칭 서명 (RS256) → Public Key 사용
- Private Key(개인키) → Authentik이 JWT를 서명할 때 사용
- Public Key(공개키) → 서버(Hono)가 JWT의 서명을 검증할 때 사용
- 대칭 서명 (HS256) → Secret Key 사용
- 이 경우 Private Key 없이, Secret Key 하나만 사용하여 JWT를 검증한다.
◼︎ Authentik에서 UID 추출하기 (v8 환경)
클라이언트는 요청 시 JWT 토큰을 Authorization 헤더에 포함하여 서버에 전달해야 한다. Authentik은 비대칭 서명 방식을 사용하기 때문에 JWKS(JSON Web Key Set) 를 통해 Authentik의 공개키를 가져와야 한다.
JWKS란? JSON Web Key Set의 약자로, JWT의 서명을 검증할 수 있는 공개키를 포함하는 JSON 형식의 데이터 구조이다.
1. jose 라이브러리 설치
V8 환경에서 비대칭 암호화 방식으로 JWT를 검증하려면 jose 라이브러리를 사용해야 한다.
1
npm install jose
jose 라이브러리는 JSON Web Token (JWT)과 관련된 기능을 제공하는 모듈로, RSA, ECDSA 등의 비대칭 암호화 방식을 포함하여 JWT를 생성하고 검증할 수 있다.
2. JWKS를 활용한 JWT 검증 미들웨어 작성
1
2
3
4
5
6
7
8
9
10
11
12
13
14
15
16
17
18
19
20
21
22
23
24
25
26
import { MiddlewareHandler } from 'hono';
import { jwtVerify, createRemoteJWKSet } from 'jose';

const AUTHENTIK_JWKS_URL = 'https://your-authentik-domain/.well-known/jwks.json';
const JWKS = createRemoteJWKSet(new URL(AUTHENTIK_JWKS_URL));

export const authMiddleware: MiddlewareHandler = async (c, next) => {
    try {
        const authHeader = c.req.header('Authorization');
        if (!authHeader || !authHeader.startsWith('Bearer ')) {
            return c.json({ error: 'Unauthorized' }, 401);
        }

        const token = authHeader.split(' ')[1]; // Bearer <token>
        const { payload } = await jwtVerify(token, JWKS, { algorithms: ['RS256'] });

        if (!payload.sub) {
            return c.json({ error: 'Invalid token' }, 401);
        }

        c.set('uid', payload.sub); // 검증된 UID 저장
        await next();
    } catch (error) {
        return c.json({ error: 'Authentication failed' }, 401);
    }
};
jwtVerify(token, JWKS, { algorithms: ['RS256'] })는 JWKS에서 공개키를 가져와 JWT의 서명을 검증하는 함수이다.-
createRemoteJWKSet는 원격 JWKS(JSON Web Key Set)를 가져와 JWT의 서명을 검증하는 데 사용된다.- URL을 기반으로 JWKS를 가져옴
- JWT의
kid(Key ID)를 확인 → JWT 헤더에 포함된kid값과 일치하는 공개키를 찾음.
3. 미들웨어를 라우터에 적용
미들웨어를 라우터에 적용하여, 모든 요청에서 인증을 거치도록 한다.
adminRouter.ts
1
2
3
4
5
6
7
8
9
10
import { Hono } from 'hono';
import { changePlanByAdmin } from '../controllers/admin-controller';
import { authMiddleware } from '../middleware/authMiddleware';

const adminRouter = new Hono();

adminRouter.use('*', authMiddleware);
adminRouter.post('/changePlanByAdmin', changePlanByAdmin);

export default adminRouter;
이제 클라이언트는 Authorization 헤더에 JWT를 포함하여 요청을 보내고, 서버는 jose 라이브러리를 사용하여 JWKS 기반의 공개키 검증 방식으로 JWT를 검증할 수 있다.